Imagine stepping into your living room, the sun streaming through the window, illuminating the warm glow of a beautifully finished hardwood floor. It feels luxurious underfoot, adding a sense of warmth and elegance to your space. But what if your home has concrete floors? Can you still achieve that dream of a hardwood floor? Absolutely! Installing hardwood flooring over concrete doesn’t have to be a daunting task, and with the right tools and information, you can transform your home into a sanctuary of comfort and style. This guide will equip you with everything you need to know to install hardwood floors on concrete, making your dream home a reality.

Image: cinvex.us
Hardwood flooring on concrete is a popular choice for homeowners seeking durability, beauty, and a touch of timeless elegance. While traditional wood floor installation often involves nailing planks directly into subfloors, concrete presents a unique challenge. Thankfully, modern installation methods and readily available materials have made it easier than ever to achieve a seamless and enduring hardwood floor on concrete. But before you get started, let’s delve into the essential steps to ensure your project is successful.
Preparing Your Concrete
The first step in installing hardwood floors on concrete is to ensure a suitable foundation. This means preparing your concrete slab to be level, clean, and dry.
Leveling the Concrete:
- Inspection: Before you start, carefully inspect your concrete floor for any cracks, unevenness, or significant imperfections.
- Self-Leveling Compound: If the concrete is uneven, use a self-leveling compound to create a smooth, even surface. This compound is poured over the concrete and allows for a flat, uniform floor.
- Time for Drying: Pay close attention to the drying time of the self-leveling compound. Allow it to cure completely before proceeding.
Cleaning the Concrete:
- Remove Debris: Clean the concrete thoroughly, sweeping away any dirt, dust, and debris. You can use a vacuum cleaner with a brush attachment to remove loose material.
- Removal of Residuals: If there is any residual paint or sealant on the concrete, use a suitable remover or scraper to remove it.
Moisture Management:
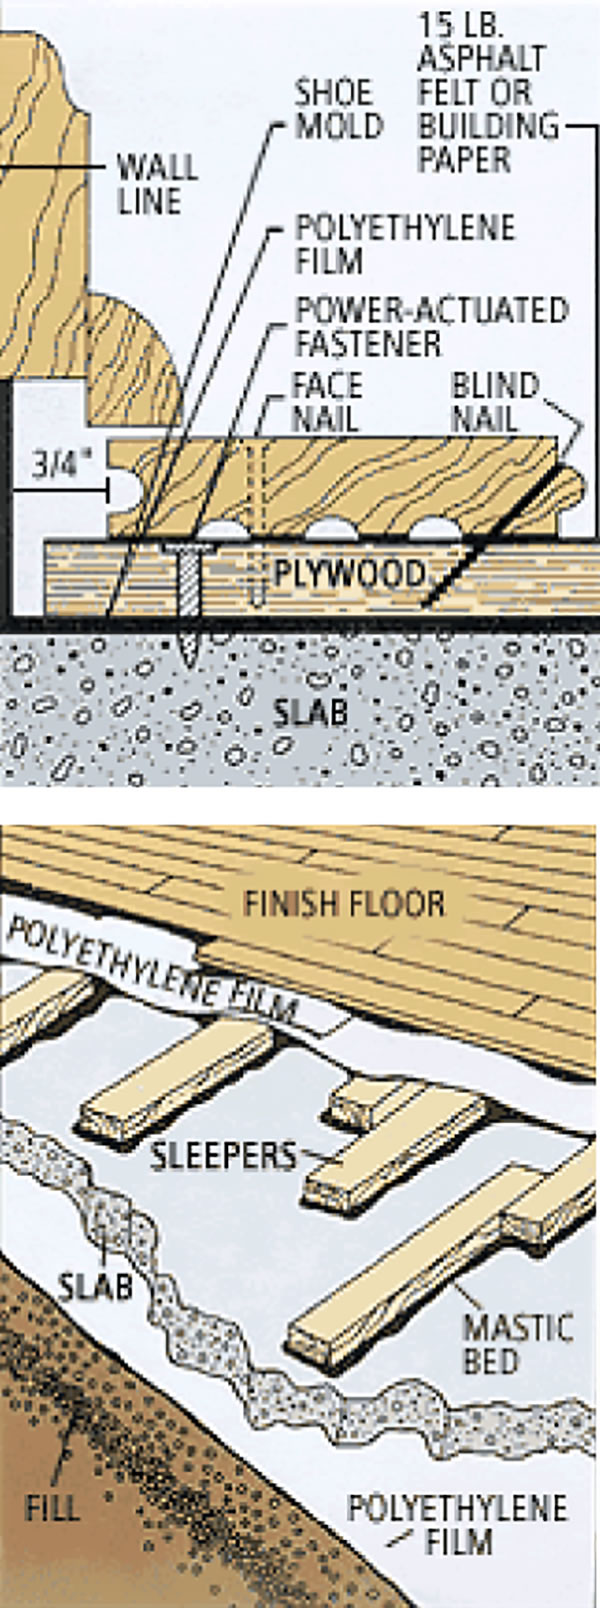
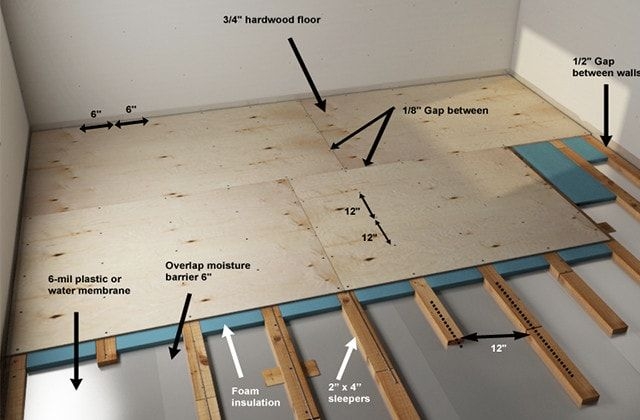
- Moisture Barrier: Moisture from the concrete slab can damage your hardwood floor over time. Therefore, it’s essential to establish a moisture barrier by applying a moisture-resistant layer over the concrete.
- Moisture Test: Before you proceed, conduct a moisture test to determine the moisture level of the concrete slab. This will help you determine the most appropriate moisture barrier for your project.
Choosing the Right Hardwood for Your Project
With the concrete foundation prepped and ready, it’s time to select the perfect hardwood for your project.
Wood Species:
- Oak: Known for its durability and classic look, making it a popular choice for flooring.
- Maple: Offers a harder and more resilient surface, ideal for high-traffic areas.
- Cherry: Embodies a warm, reddish-brown hue and a distinctive grain pattern.
Wood Flooring Styles:
- Solid Hardwood: A traditional choice, offering durability and beauty.
- Engineered Hardwood: Constructed with layers of wood veneer glued to a plywood core. This offers stability and can be installed on concrete with ease.
- Prefinished Hardwood: Comes with a protective finish already applied, simplifying the installation process.
Choosing a Finish:
- Staining: Stain your hardwood floor to achieve a beautiful, personalized look.
- Sealing: Seal the floors to protect them from water damage and scratches.
Installing Hardwood Flooring on Concrete: Step-by-Step
Now that you have prepared the concrete and chosen your hardwood, it’s time to install the flooring.
Step 1: Install the Underlayment
- Purpose: The underlayment is a crucial layer that provides insulation and protection for your hardwood floor.
- Types: Choose from various materials like foam, cork, and rubber.
- Installation: Lay the underlayment over the concrete, ensuring it’s smooth and free of wrinkles or gaps.
Step 2: Install the Hardwood Flooring
-
Installation Method: Choose from three common methods for installing hardwood flooring on concrete:
- Glue-Down Installation: The most common method, where you spread adhesive directly onto the concrete and lay the flooring planks in place.
- Float Installation: This involves installing the flooring with a floating method, allowing planks to move freely, reducing the risk of buckling.
- Nail-Down Installation: Requires a special underlayment that allows you to nail the planks into place.
-
Laying the Planks: Start in a corner of the room and follow the instructions for your chosen installation method. Ensure each plank is properly butted up against the next.
-
Tapping and Clamping: Use a tapping block and mallet to tap the planks into place.
-
Cutting for Fit: Use a circular saw or jigsaw to cut planks to fit around obstacles and in corners.
Step 3: Finishing Touches
- Trim and Transition Strips: Use trim and transition strips to create a neat and seamless finish around doors and edges.
- Sanding and Refinishing: (For solid hardwood floors) Sand the floors to remove any imperfections and apply a protective finish.

Image: alquilercastilloshinchables.info
Expert Insights & Actionable Tips
Expert Tip 1: Invest in Professional Installation: If you are not experienced with DIY projects, consider hiring a professional installer to ensure a clean and lasting installation.
Actionable Tip 1: Choose Your Hardwood Wisely: Take the time to select hardwood that suits your lifestyle and preferences. Consider factors like durability, maintenance, and aesthetic appeal.
Expert Tip 2: Carefully Plan Your Floor Layout: Measure your room carefully and create a plan for the layout of your hardwood floor. This will ensure the floor is installed efficiently and reduces waste.
Actionable Tip 2: Seek Advice: Never hesitate to seek advice from experienced professionals or flooring experts. They can help you make informed decisions during the installation process.
How To Put Hardwood Floor On Concrete
Conclusion:
Installing hardwood flooring on concrete can be a fulfilling project, transforming your home into a haven of beauty and comfort. By following these steps and seeking professional advice when needed, you can create a durable and stunning hardwood floor that will be enjoyed for years to come. So, take the first step, gather your tools, and unleash your inner DIYer. With a little patience and care, your dream hardwood floor on concrete is within reach, adding warmth, style, and a touch of luxury to your home.


